Sensor nodes deployed inside water are known to be underwater sensor networks. These network is helpful in fish cultivation, habitat monitoring, predicting ptusami, etc.
Updated 9th April 2016 : the link to download the Aquasim is updated, the regular link is not working
This network uses different MAC protocol, routing protocol, etc. Real test bed are costlier and one cannot afford it. Simulators are the ultimate solution to know about these networks. Aquasim is one such tool that is integrated in ns2 for handling underwater sensor networks. This simulator supports new mac layer, new protocols that are helpful in routing inside water. There are examples also to simulate these networks.
Here is the installation steps of Aquasim. Some points to be taken care of
- ns-allinone-2.30 is used in creating the underwater sensor networks
- nam misbehaves (or does not work) in recent Ubuntu and Mint distributions.
- Need to have the X11, automake and build essential tools to install Aquasim.
OS Tested: Ubuntu 14.04+ and Linux Mint 17+
AquaSim: 1.0 Version (It does not have a 3D version)
Download the aquasim simulator
Here are steps to install the libraries needed to install Aquasim
pradeep@localhost $] sudo apt-get update
pradeep@localhost $] sudo apt-get install libxmu-dev build-essential autoconf automake
Create a folder called aquasim/ and extract the Aquasim-1.0.tgz inside this folder
pradeep@localhost $] mkdir aquasim
pradeep@localhost $] cd aquasim/
copy the Aquasim-1.0.tgz in aquasim folder and extract it using
pradeep@localhost $] tar zxvf Aquasim-1.0.tgz
pradeep@localhost $] ./install
You may get an error as stated below: to clear this error, do the following step
Open the file (~aquasim/ns-2.30/linkstate/ls.h) using gedit or vi or vim
In line number 137, change the following line
void eraseAll() { erase(baseMap::begin(), baseMap::end()); }
to
void eraseAll() { this->erase(baseMap::begin(), baseMap::end()); }
and again issue the command ./install . After successful installation, some paths will be provided. You need to paste those paths in the /home/pradeepkumar/.profile or .bashrc (/home/pradeepkumar/ is my home, you have to use your corresponding directory where the software is installed)
Here is the sample path in my .profile file
export PATH=$PATH:/home/pradeepkumar/aquasim/bin:/home/pradeepkumar/aquasim/tcl8.4.13/unix:/home/pradeepkumar/aquasim/tk8.4.13/unix
export LD_LIBRARY_PATH=/home/pradeepkumar/aquasim/otcl-1.12:/home/pradeepkumar/aquasim/lib
export TCL_LIBRARY=/home/pradeepkumar/aquasim/tcl8.4.13/library
After setting these paths, you logout and login back and aquasim works well now.
Open the terminal and type ns, if it indicates a %, then aquasim was installed successfully.
Nam as i said earlier, may not work well, here is a workaround - please follow the link - http://www.nsnam.com/2015/07/nam-installation-segmentation-fault.html
Once installed, you can explore the folder /home/pradeepkumar/aquasim/ns-2.30/underwatersensor
This folder contains all the source codes relevant to the under water sensor networks. The above folder has five sub folders like uw_common/, uw_routing/, uw_mac/, uw_mobility_pattern/ and uw_tcl/
pradeep@localhost $] cd uw_tcl/
will give you the examples of under water sensor networks.
pradeep@localhost $] ns vbf_example_5.tcl
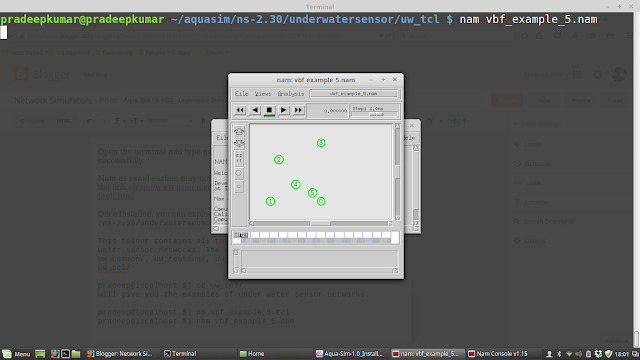
pradeep@localhost $] nam vbf_example_5.nam
Here is the screenshot of the example run using nam
 |
| Aquasim |
Comment below for any queries related to this installation.
T S Pradeep Kumar

sir , some files are missing, as it is not getting installed. i tried many times. can u please help me out
ReplyDeleteHey! I am having this issue,
ReplyDeletemake: gcc-4.3: Command not found
make: *** [Makefile:92: libotcl.a] Error 127
otcl-1.12 make failed! Exiting ...
See http://www.isi.edu/nsnam/ns/ns-problems.html for problems
Did you successfully install aquasim? If yes please reply...
I am getting same error. Did you solve this?
DeleteSir,
ReplyDeleteCan you share the files pls
hello in first thanks for your help
ReplyDeletein try to install aqusim by using ns 2.30 and test of successfully is good ns command give % but instruction ns vbf_example_5.tcl give folloying message
the file name is vbf_example_5.data
the sending interval is 10.0
invalid command name "Agent/Vectorbasedforward"
while executing
"Agent/Vectorbasedforward set hop_by_hop_ 0"
(file "vbf_example_5.tcl" line 64)
hello sir
ReplyDeletefirst thanks for your help
please, only i follow the same way to install aquasim with ns 2.30 in linux mint 18, but in execution i have some error like this
$ ns
%
~/aquasim/ns-2.30/underwatersensor/uw_tcl $ ns vbf_example_5.tcl
the file name is vbf_example_5.data
the sending interval is 10.0
invalid command name "Agent/Vectorbasedforward"
while executing
"Agent/Vectorbasedforward set hop_by_hop_ 0"
(file "vbf_example_5.tcl" line 64)
please whet is the solution?
my regards
I want aqua sim in ns2 code
ReplyDelete